|
Convair
F-106 Delta Dart |
 |
|
Convair
F-106 Delta Dart |
|
| Fan & Elevon Servo Installation | |
 |
 |
|
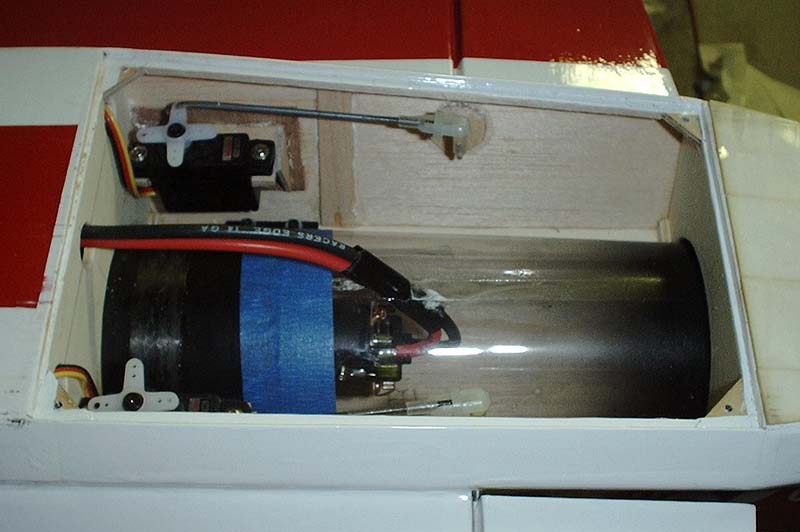
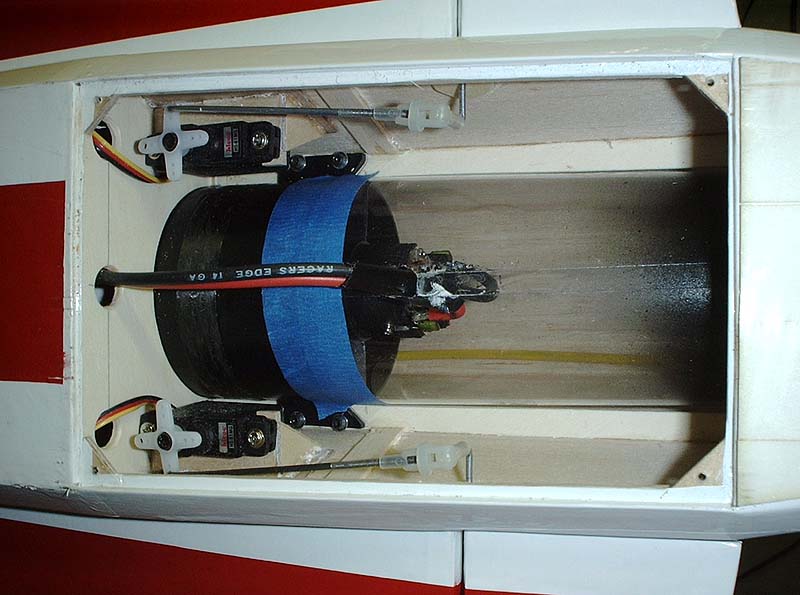
Cut out two 1-1/2" X 2" pieces of 1/64" plywood reinforcement plates. Glue these to the inside of the motor compartment. Make up two 1/8" birch plywood servo mounts and two 1/8" poplar plywood servo mount gussets. Drill servo mounting screw holes in the servo mounts and make sure the elevon servos can mount to them. Bevel the outboard edge of the servo mount so that the servo mounting plate will be level when glued into place. Position and tack glue the servo mounts to the 1/64" plywood plates. Position and glue the gussets between the bottom of the servo plate and the 1/64" plywood plates. Mount the servos to the plates. Cut out two 1/16" birch plywood elevon bearing plates and drill a hole in the center of each one to match the diameter of the elevon torque rods. On the prototype, 2-56 steel pushrods were used as the elevon torque rods and 1/2-A DuBro aileron torque rod fittings were used to connect the elevon servo pushrods to the elevon torque rods. SIG EZ hinges were used to connect the elevons to the wings. Make up the torque rods so they will extend 1/2" into the motor compartment. Make sure that the threaded end of the pushrod is on the inside portion of the torque rod. Mark the position where the torque rods will pass through the fuselage sides and drill a hole through the 3/32" balsa fuselage sheeting. Install, but don't glue the elevon torque rods into the elevons and slip the torque through the holes you just drilled. Slide the elevon bearing plates over the end of the torque rods and tack glue these to the inside of the fuselage sheeting. Remove the elevons and torque rods. Reinforce the glue joint so that the elevon bearing plates are solidly mounted to the inside of the fuselage side sheeting. Using fine sandpaper, rough up the torque rods where they will contact the elevons, then glue them into the elevons using either 5-minute epoxy or medium thickness CA glue. |
Slip the elevon pushrods through the fuselage sides and the elevon bearing plates and slide the elevon hinges into their slots in the trailing edge of the wing. Make sure that the elevons move freely. When satisfied with the fit, glue the elevon hinges to the wing and elevons using thin CA glue. When the glue is dry, flex the elevons so the hinges move freely. Screw the nylon fittings to the end of the elevon torque rods and slide the servo arms onto the servos. Make up a pushrod to run from each servo to the nylon fitting on the elevon torque rod. Using the template provided, make a thrust tube out of thin clear plastic sheet. The prototype used .010 polyester desk protector purchased from an office supply store. Make sure the thrust tube slides onto rear of the fan unit at least 1/4". The diameter of the trailing edge of the thrust tube should be about 57-58 mm. When satisfied with the fit, mark the location wherre the motor wires will enter the thrust tube and remove the thrust tube from the fan unit. Solder the motor wires to the motor and mount the fan unit to the fan mounting rails. Cut a hole that is large enough for the motor wires to pass through freely. Slip the thrust tube through the aft bulkheads and slide it over the aft end of the fan unit. Use some masking tape to secure the thrust tube to the fan unit. You should only have to tape the bottom half of motor/thrust tube. Cut four 1/2" X 1/2" triangles out of 1/8" birch plywood that will act as the hatch mounting plates. Glue these to the four corners of the motor compartment so that the 1/8" poplar plywood hatch is flush with the outside of the bottom fuselage sheeting. Drill and tap each of the mounting plates and hatch to accept standard servo mounting screws. |
|
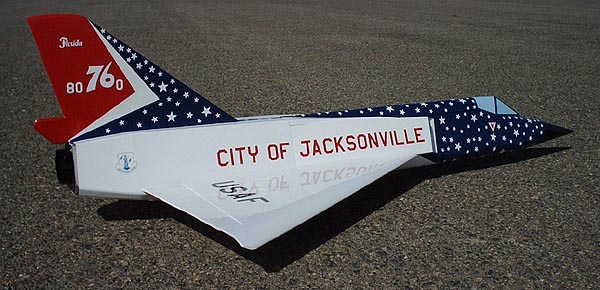
Construction time to this point took about 4 hours. This concludes the basic construction of the model. It is now ready for final sanding and finishing. Because the outer surface of the model is fully sheeting, you may finish it using a variety of methods including film or fiberglass and paint. The prototype was covered in TopFlite Monokote. The colors used were; Jet White, Insignia Blue and True Red. The windscreen and canopy were covered in Blue Mist and the nose cone in gloss Black |
|
|
Home | Wings | Fuselage | Fan | Servos | Final Assembly | Covering | Finish | Components | Flight | Gallery |
|